E-Mail:

If you enjoyed visiting this blog, please leave a comment or feel free to contact me by e-mail: timstanks@icloud.com

Search This Blog

Sunday 15 September 2013

Square Bashing terrain pieces - Fab Foam

Following one of our frequent visits to the Hereford Hobbycraft Store, my wife introduced Me to Fab Foam. This comes in A4 & A3 sheets (50 or 80p respectively) about 1-2mm thick and in an endless variety of colours. Some (not many) can also be had as self-adhesive sheets. It's very light and flexible, and easy to cut with either knife or scissors.
I've been thinking ever since that this material offered an alternative to the old felt shapes to designate woods etc. and finally I got my chance to try it out by knocking together some basic terrain bits for my SB II game board.
The wooded area bases were cut from brown sheets, dry-brushed green and burnt umber and with clump foliage attached.
The roads were 30mm wide base from brown with 20mm wide metalled area from self-adhesive sheet. Dry brushed grey with some left over Jarvis N Gauge hedging added.

The built up area base is grey sheet with self-adhesive metalled area running through the middle.
The canal was from A3 blue sheet with grey tow paths added from grey A3 sheet - glued with Bostick multi-purpose glue.
Next, I'm going to make some modest hills from foam board and some trench lines with no mans land using mdf boards as a base.

Saturday 14 September 2013

Square Bashing Playing Surface

As part of my 10mm SB II plans I needed a playing surface.

The rules state an area of  48 (8 x 6) 150x150mm squares - 1200x900mm for the 15mm game.

I've decided (rightly or wrongly) to reduce the square size to 100x100mm as my figures are on much smaller bases (25x20mm rather than 30x30mm).

This would mean I need an area 800x600mm. I found the answer in Hobbycraft - an 800x600mm ready prepared canvas. 

started by giving the canvas a coat of cheap acrylic green paint.
Next I gave it an all over wash of diluted antique oak coloured satin varnish.
To take the sheen off I gave it a coat of Army Painter matt coat spray.
 
Then finally I marked out the grid with a Sharpie permanent pen.
Now all I need are some terrain pieces mounted on 2 square big mdf sheets as described in the rule book, hills, shelled areas, woods, built up areas etc...

Make your own bocage hedges - part three

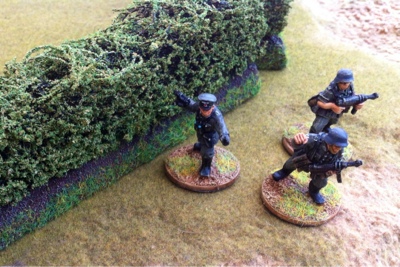
So here's a few pictures of the finished hedges in action so to speak.....


Whilst they are tall enough to provide ample cover for these Crusader Miniatures they would also work fine with my 15mm armour infantry.

Hope this proved useful....I'd better get on with the other 20.

Make your own bocage hedges - part two

Now for the tricky bit, making the hedges.

I was persuaded by my dear wife to purchase some rubberised horsehair from a very nice man we met at the recent IPMS show near Bristol. He took us through his hedge making methods and showed us the examples he'd made on his stand...and we were sold.

To be honest I'd often read about rubberised horsehair and its mystical properties where model making were concerned. As I'd never ever seen it anywhere for real I wondered if it really existed, but here it was and you could buy various different sizes of pieces too. I also learnt that it is still used in the furniture making business so if you have any local upholsterers you may already have a source?

This particular piece was 25mm thick, 150mm wide and 460mm long. And only cost £8.
This meant it could be cut into 23 pieces, each 25x150x20mm, that's only 35p per length of hedge.
Having teased the edges a bit by hand to give the hedges a slightly more natural look, I sprayed them with matt black paint.
Once dry I sprayed them with some spray mounting glue I bought cheaply at a Wilkinsons Store (£3 I think) before dipping the hedges in flock. The flock was some really old stuff from Games Workshop that I'd had lying around for years.
It was a fairly lightish green but doesn't look too bad once applied. The spray mount I was to find to my cost, never actually dries completely. However when I thought it seemed dry enough, I sprayed the hedges with some very dilute PVA via an old pump atomiser (ex-air freshener I think) to seal the flock in place. I then left them overnight to dry. 

The guy on the horsehair stall used ordinary hairspray to attach the flock.....maybe I'll try this next time?
Once dry it was time to attach the hedges to the banks. I used high tack PVA for this.
I was worried that gluing a flat bottomed hedge to a round topped bank might result in a poor bond, so I placed some weight on the top whilst the glue set, to maximise adherence.
The next morning I discovered that the spray mount still had some life in it! When I lifted off the weight, the hedges, whilst well glued to the banks, stayed squashed down as flat as a pancake. :-(
A bit of judicial tugging and teasing saved the day and got them back to their full height (phew).

So there you are....finished 150mm lengths of bocage. Each cost me about £1 to make.

See the finished article in part three.


Make your own bocage hedges - part one

I've never been that keen on making my own terrain features, probably because there are so many good commercial items available.

With my purchase of CoC I decided I was finally going to have to acquire a good selection of hedging to represent the bocage on my wargames table.

There are a good many commercially available examples.....but all share the same feature.....They're very expensive!

So my hand was forced....I'd have to make my own. And as this was going to be a first for me I thought I'd let you share my experiences.

The first step was to select some wood to make the earth banks. I was looking for something like a broom handle cut in half lengthways, but I failed dismally in my quest.
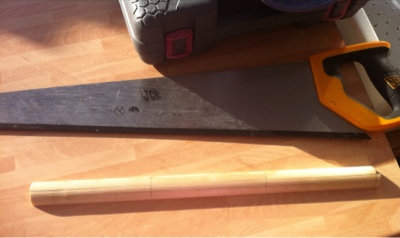
The best I could come up with was 1/4 round beading about 12mm radius. I bought a piece about 900mm long for £1.50 from our local B&Q and cut it in half before gluing the two halves lengthways and clamping while it dried overnight.
Next I cut the glued piece into three 150mm lengths and sanded off the rough ends.

Now these were coated in diluted PVA and dipped in bird cage sand. I placed these on tin foil to dry so they don't stick to the work top.
Some time back my son bought me an aerosol can of Camo Brown paint from Halfords. I was saving this to use for my Zulu's base coat, but needs must, this was perfect as a base coat for bocage hedges too!
Once dry they were dry brushed with Vallejo Buff to pick out the texture of the sand.
Finally to complete the banks I attached some static grass with more PVA .
Now with these completed, it was time to press on with the hedges to stick on top.

See you in part two.

Monday 2 September 2013

DMH - Artizan Miniatures reinforcements arrive?

I bought these figures from an Ebay shop a couple of weeks ago. The casting quality was very good as was the design and sculpting.
This group were titled "the Posse" - I just love the long coats and rather Hillbilly look of two of the figures. Easy to clean up and a pleasure to paint, they are a good match with the DMH figures from Great Escape Games.
This group were simply irresistible to a fan of the Good the Bad and the Ugly! Lovely miniature character studies of the three main characters. Even gave me an excuse to watch it again for painting references!
I was tempted into another 4Ground building whilst at Firestorm Games Cardiff. Again a pleasure to assemble. All the initial range of buildings are the same footprint even the two story ones. I guess if you were so inclined you could mix and match to create custom buildings! This one also included a base that raises the building slightly and a length of boardwalk. 

They come without signs but there are a selection of colour PDFs available to download free on the DMH website. Printed out as they come - don't increase or decrease size - they are perfect. I laminated it before I cut it out and sprayed it with matt varnish. This then allowed me to glue it in place with just a few blobs of multipurpose glue avoiding any wrinkling (like I'd get just sticking paper with PVA).

Very good, looking just the part......