E-Mail:

If you enjoyed visiting this blog, please leave a comment or feel free to contact me by e-mail: timstanks@icloud.com

Search This Blog

Monday 29 January 2018

Team Yankee – 15mm British Mechanised Infantry and Milan Teams


As opposition to my Soviets I treated myself to a platoon of British mechanised infantry and a Milan ATGW platoon.

These are cast white metal figures that considering they are quite newly released, take a little bit of cleaning up before you can paint them.
Once that was done I attached the figures to lolly sticks (from Hobbycraft) with PVA glue and allowed to dry overnight.

They were then spray primed with Army Painter Matt white primer.
At this point my technique for painting British DPM material differs from that described in the Iron Maiden supplement. Closer examination of the DPM material will reveal that the base colour is in fact a sandy colour (from Buff through to Dark Yellow dependent on the amount of laundering) not green as described. The green, red brown & black pattern is printed over this base colour.
I guess the ratio of colours in DPM was somewhere in the order of;-
  1. Dark Yellow (30%)
  2. Green (30%)
  3. Red Brown (30%)
  4. Black (10%)

Therefore my base coat was Vallejo Panzer Yellow – in this case the ModelAir version applied with my airbrush.

This was then followed by brush applied green patches (Vallejo US Army Uniform green- a bit like GW Goblin Green)
Then red brown patches (Vallejo Game Colour leather Brown)
After this the ’58 Pattern Webbing was painted Vallejo Grey Green. When new the webbing is a dark green (Almost Vallejo Russian Green) colour. But it rapidly fades in use to a greeny grey shade.

I also painted the rifle sling at the same time (these could be any colour from sand through to dark green dependent on age and material of manufacture). The cloth puttees were then painted Vallejo Khaki.
NB: In the British Army of the ‘80s all troops wore DMS Black Leather boots with cloth wrap-around khaki puttees – however any Light Division units (i.e. Royal Green Jackets, Gurkhas, Light Infantry) were required to dye their's Jungle Green.

The figures were then given an all over coat of Vallejo Sepia Wash.
Once dry, the boots and SLRs were picked out in black together with the bottle top (which pokes out of what I'm assuming is a ’44 pattern pouch? NB: These were non-standard but popular items as they gave quicker access to the bottle than the '58 pattern item).
'44 Pattern Water Bottle Pouch

'58 Pattern Water Bottle Pouch
The black element of the DPM cloth was added at this stage in the form of small black lines here and there. Also the flesh areas were painted and given a flesh wash to add depth. You would be hard pressed to find a British infantryman of this area without his face and hands smeared in camouflage cream. However I chose not to depict this as it makes it look like you've done a bad paint job and forgotten to touch up afterwards!
NB: At this time in history it was not unheard of to find SLRs that still sported the original wooden furniture, or indeed a mixture of wooden stock. pistol grip and black nylon hand-guard.

The helmets as depicted are covered firstly in hessian (cut from a sandbag), then scrim netting and finally strips of different coloured hessian and scrim attached to break up the outline. I painted them Vallejo Military Green and applied a Vallejo Sepia Wash, before dry brushing Vallejo Iraqi Sand and picking out individual strips with Vallejo Khaki.

The Milan firing posts were painted Vallejo Russian Green and then weathered.
The bases came with blanking discs for use with the prone figures, which was nice! These were simply left as they came, painted with cheap acrylics and dry brushed with a lighter colour, before super gluing the figures in place. To get a good bond I score the base surface with a scaplel first.

Nice additions to the collection and not badly priced – in the case of the Milan Platoon £7.20 (at Firestorm) for 20 figures + Bases. Which is comparable in cost to say Peter Pig figures.

Just a coat of varnish to apply and some flock and they'll be finished.

Tuesday 23 January 2018

Team Yankee New Plastic Soviets – Painted Part Two

I decided to start the basing with the support weapon bases. To accommodate the prone AT4 (Fagot) launcher figures I felt it best to level the areas where they’d be glued down. I did this with a smear of acrylic artist’s paste and left this to dry overnight.
Now I’m new to Battlefront’s pre-holed bases and naively thought the individual figure bases would fit exactly in the holes. Sadly the bases were just a bit smaller than the holes, leaving a noticeable gap. So having glued the support weapon assistant figures in place using superglue, I decided that I’d have to cover the bases with some sort of texture to hide these gaps.
I decided to use my old favourite – Vallejo’s grey pumice – for this purpose.
Where the prone figures were to be placed I left the surface free of texture to ensure a good bond and avoid them looking like they were perched on top rather than lying amongst the terrain. To ensure this happened I drew around the figures with pencil before applying the paste
.Spreading it on with a fine artist’s pallet knife it looks like snow as you apply it, but dries almost transparent.
All the other bases were coated with Vallejo’s grey pumice too.
When all was dry (overnight again), the surface was painted using a cheap craft acrylic paint from Hobbycraft – “Coffee Bean”. This was almost a perfect match for Battlefronts plastic bases. Once dry, I dry-brushed the surface with Iraqi Sand. Then finally the chamfered base edge was picked out in a lighter brown.
Once everything was completely dry, I sprayed firstly Army Painter Satin Varnish (to protect my paint job) followed by – once dry – Army Painter Anti-Shine Matt Varnish (to give a realistic finish).
The last job was to add a mixture of summer green and autumn flock.
Great miniatures can’t wait to try them out!

Monday 22 January 2018

Rommel Scenario - "Operation Perch"

As a further taster here’s a draft version of the scenario map.

It’s somewhat stylised to ensure that all the key features of the battle area are included.

The Allied force enters the table and deploys in grid squares A:1- A:5. (Army Cards)

The historical plan for 7th Armoured Division was as follows;-
  • The 4th County of London Yeomanry (Sharpshooters) (4th CLY), with a company of the 1st Battalion Rifle Brigade, was to pass through Villers-Bocage and occupy the highest point of the ridge at Point 213.
  • The 1/7th Queen's Royal Regiment (West Surrey) would follow up and occupy the town and the 5th Royal Tank Regiment (5th RTR) and a company of the Rifle Brigade, were to take high ground at Maisoncelles-Pelvey to the south-west of Villers-Bocage.
  • The 65th Anti-tank Battery of the Norfolk Yeomanry would cover the gap between the 4th CLY and the 5th RTR with 17pdr SP Achilles self-propelled anti-tank guns.
  • The 5th Regiment, Royal Horse Artillery (5th RHA), would follow the rest of the brigade group with its Sexton self-propelled guns.The 5th RHA and the brigade group tactical headquarters were established at Amayé-sur-Seulles
  • The two Hussar regiments were to provide flank protection against the Panzer-Lehr Division and uncover German positions either side of the line of advance
  • The 131st Infantry Brigade, with the 1st Royal Tank Regiment (1st RTR) and the 1/5th and 1/6th Queen's, was to hold Livry as a firm base.

The German Forces will be scattered to the East of the River Seulles.

I haven’t a clue how to do it yet, but will come up with some random system of generating force strengths together with when and where they enter the table. This will be made up of elements of Panzer Lehr, 2nd Panzer Division and of course Wittman’s 101 Heavy Tank Company.

The actual battle lasted two days culminating with 7th Armoured Division withdrawing to a holding position around Amayé-sur-Seulles. This was due to Brigadier “Looney” Hinde deciding to take an overnight stop around Livry following an attempted counter-attack from elements of Panzer Lehr.

For gaming purposes I think the battle will fit into the standard 16 turn game.


Please feel free to pass comment as this plan evolves.

Thursday 18 January 2018

Team Yankee – 15mm T64 Part One

I had some time to spare last night so thought I’d knock together one of the three T64’s that came with the Hammerfall Starter Set.
The kit is moulded on a single sprue in dark green plastic. The parts look crisp, flash free and finely detailed.

There’s a basic exploded assembly diagram in the quick start guide which will suffice. But I’d guess there’s a more detailed version on their website (perhaps even a YouTube video)
.The drawing gives no indication what order to do things in (Perhaps I should have looked on line!) so I decided to work from the ground up, starting with the hull.

The track units are one piece and really well detailed. You cannot get them mixed up as their location blocks are off-set to suit each side.

You can add the rear plate at this stage as it is positively located, and fix the un-ditching beam while you’re at it.

The hull top fits nicely and is very well detailed. There are some optional fuel drums to add to the rear as well as the rubber side skirts – which can be left off if you wanted to. Not shown in my photos are the mine plough attachments which you could fit as a further option. Nice touch!

Having completed the hull, it’s time to move on to the turret assembly. There are optional commander’s cupolas – open/closed – and (like the M1 Abrams) a spare AAMG included on the sprue.

The rear of the turret is adorned with stowage box and snorkelling tubes. The front has smoke dischargers – these differ on the left and right, but you cannot go wrong as there is a recess that will only accept the correct part.

I opted to add one of the six tank commander half-figures that came with the set. They are all larger than the opening in the cupola (maybe they were designed for the T72 or BMP models?) but it’s an easy enough job to trim the figure’s waist until he is a snug fit.


Altogether a very nice model. Goes together well, is nicely detailed and captures the look of the rear vehicle. 
 Here's a couple of photos alongside the opposition.

Wednesday 17 January 2018

Rommel - Scenario "Operation Perch"

 I'm currently putting together a scenario for Sam Mustafa's Rommel Rules.

The action I'm trying to cover is the fighting in the "Caumont Gap" leading up to the famous action at Villers Bocage, between the 7th Armoured  and Panzer Lehr Divisions in June 1944.
I felt that this action was perfect for a fairly standard game of Rommel.
It's early days, but as a taster I thought I'd share the unit cards I've created for the battle.

Unit Cards Operation Perch

These are designed so they print out at 40x40mm you could then laminate them, cut them out and glue to either card or pre-cut mdf bases.

Any comments on these would be appreciated.

Tuesday 16 January 2018

Zvezda 15mm M1 Abrams

This model comes on two sprues packed in Zvezda’s usual cardboard carton together with a small decal sheet, Art of Tactic data card and instruction sheet.
Now one thing I cannot get my head around is their pricing structure for these kits. The WW2 range all cost around £3.50 each these days, however there are some anomalies.
The Tiger I comes in at £6.50 (which makes it more expensive than the PSC offering) as does the T35. However the Maus is only £3.50??

The entire Modern range is priced at £6.50 and I’ve read on-line that this is because of a "more limited market"? But the models themselves are no more complex to produce than their WW2 brethren?

Anyway, we are where we are! As ever the moulding quality is good. The plastic material used takes glue well and there is the bonus of some very simple decals.
The model goes together well. It is of the IMPM1 with the 120mm gun.
There are the usual Zvezda wacky ways of attaching some of the parts (I guess this is to keep it snap-fit?). You can see what I mean from the pictures the means of attaching the tracks is a little over complicated to say the least.
However……and it’s a big however… the detail on the moulded parts is pretty basic……
I fact I’d go as far as to say it’s really quite poor.
The side plates have no engraving whatsoever….just one big plate! And the tracks are over simplified.

The turret is probably the worse bit. to start with the detail is pretty light, and there is no environment sensor, but I guess this would be easy to add. But the lack of smoke dischargers is inexcusable and the greatly over simplified stowage rack is shocking.
As there were no Commander or loader MGs included either, I used my spares from the Battlefront offering to jazz things up a bit.
Size wise it compares reasonably well with the Battlefront M1 although the main gun looks really puny...or maybe the Battlefront one is too big? I'm not certain..
Hull dimensions and turret dimensions are broadly similar.
I think once painted the same, they will mix OK on the table together. 

Sadly this is overall a really disappointing kit. When I think back how much I have enjoyed their other models (And I have built examples of the entire WW2 range) this one doesn't really hit the mark, and at nearly twice the normal price does not represent good value for money.

Team Yankee – Hammerfall Starter Set

I made a start of the plastic kits that came with my Hammerfall set this weekend.  The set comes with two M1 Abrams and three T64s. In addition there is a quick start guide with assembly instructions, an A5 version of the original Team Yankee rule book, some 2D cardboard terrain, dice and some tank commander half figures.
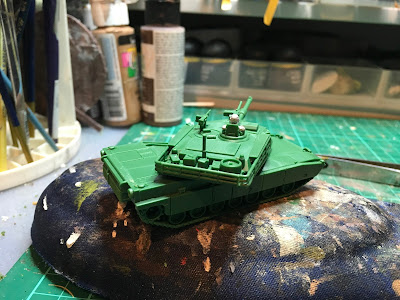
I started with the M1 kit which comes on two sprues in a horrible shade of green. 
You have the option to produce the original M1 with 105mm main gun or the IMPM1 with the 120mm Rheinmetal cannon and some other minor mods. I chose to build the later.
The hull and running gear goes together really well. There is nice detail on the tracks and the side plates are nicely engraved. There is a choice here of which guards go over the drive sprocket.
The turret halves go together easily and it is at this point you have a choice of stowage racks to fix to the sides.
The position of these was not entirely clear to me from the assembly instructions included, so I referred to the Battlefront website, where all became clear.
There was one US tank commander (in white metal) include with the set so I chose to model the cupola hatch open.
There are also nice renditions of the commander’s .5” HMG and loader’s GPMG to add to the turret. A nice touch here was to include two of each, in case you broke a barrel or something removing them from the sprue.
The turret was finished off with the environment sensor mast and a selection of stowage for the basket (jerry cans, boxes, spare wheel etc.)
Altogether a nice little model. Goes together well, good detail and captures the look of the real thing.

This prompted me to remember I still had two Zvezda 1/100 M1 Abrams in their boxes, as yet unmade. Why not build them too so I could do a comparison?